Twist Measurement in Yarn
Twist Measurement in Yarn :
Twist Measurement in Yarn :
The most obvious way to measure the number of twists per unit length of yarn is simply to untwist a known length of the yarn and check visually to see whether the twist has been completely removed.
General specification required for twist measurement
Twist testing methods depends on the specification, accuracy, demanded, from of the sample etc. In general the following points may be followed for getting reliable result. They are-
Usually twist is not distributed uniformly along a yarn. Speaking technically, the amount of twist in a materials is inversely proportional to its thickness. This from is ‘twist x weight=constant’’. And for to avoiding having bias in twist measurement, twist should be determined at fixed intervals along the yarn that is 1 yard of distance which is suitable.
Withdrawal of yarn over the end of the package adds twist to a yarn, whereas withdrawal from the side of the package does not. The yarn should be withdrawn from the package in the manner in which it would be normally used in the next stage of processing. The package should be mounted vertically on a peg and free to rotate about the peg as the yarn is withdrawn gently from it.
The actual test specimen should be handled manually such that the fingers do not touch the length over which the twist is actually measured.
In the case of plied and cabled spun yarn and continuous filament yarn, at least 20 specimens are to be tested if the length is 500 mm according to BIS (British Standards Institution). In the case of single spun yarn, BSI recommends 50 specimens of 25 mm each.
The tension is the test specimen must be constant. BSI recommends a yarn tension level of tex/2±10% grams. For example: A 40s Nec count (i.e. about 15 tex) yarn would be maintained at a tension in the range 6.35-8.25 grams.
Techniques of twist Measurements
The most common techniques that have been used for measuring yam twist are listed below.
❶ Straightened fiber technique or the direct count method.
❷ Twist contraction technique or the untwist and re-twist method.
❸ Twist to break technique.
❹ Microscopic
❶ The straightened fiber technique
(A) Straightened twist tester
Principle:
Used only for testing single spun yarns, this technique involves the untwisting of the test specimen until all of the twist is removed. The completeness of the untwisting is verified by visual examination of the straightening of all of the fibers in the strand – this is why the name ‘straightened fiber technique’. The number of turns required for the untwisting is counted and the number is divided by the length of the test specimen to arrive at the twist of the test yarn turns per unit length
This technique is also known as the ‘direct count method‘, as the twist in the yarn is directly counted.
Construction:
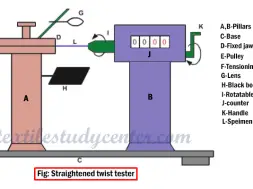
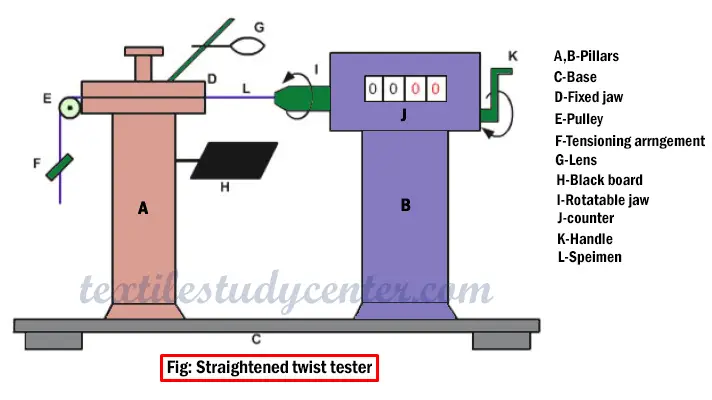
The below figure depicts the salient features of a single yarn twist tester incorporating the straightened fiber technique. The instrument consists of two pillars, A and B, mounted on a rigid base C. On pillar A are mounted a fixed jaw D, a guide pulley E, a tensioning arrangement F, a magnifying lens G and a blackboard H. Pillar B carries a jaw I that can be rotated manually either way by means of handle K and the number of revolutions is recorded in the revolution counter J. A length of 25 mm (or one inch), the test length normally used, separates the faces of the jaws D and I. A test specimen L can be seen mounted between the two Jaws.

Test Procedure:
The first step is to set the revolution spystealth counter to zero.
Next clamp the test yam in the rotatable jaw. Open the static jaw and lead the yarn through it and then over the guide pulley; attach a small weight to the yarn to give it the required tension and then close the jaw to clamp the yarn.
Check, by means of lens G if necessary, the twist direction of the test specimen. Then using the handle, rotate jaw I in a clockwise or anti-clockwise direction so as to untwist the yarn.
Note the twist in the yarn being removed. When most of the twist has been removed, push a sharp needle through the middle of the partially untwisted strand so it nearly touches the static jaw; then, looking through lens G, gently move the needle towards the other jaw.
Give the handle a final rotation either way until the needle is in the closest possible position to the rotatable jaw.
Finally, the number of turns of the rotatable jaw required to untwist the test specimen is read off the revolution counter and recorded.
At least 50 tests are conducted in this manner and the mean TPI and CV% are calculated.
Test Results: The mean instrument reading is first calculated and then the twist is expressed either in terms of turns per inch (TPI) or turns per meter (TPI) as follows.
If the mean instrument reading is ‘m’ turns and the test length is one inch, then the twist in the yarn is m TPI or 39.37 m TPM. If the test length is 25 mm, the twist is (25.4m/25) TPI or40 m TPM.
(B) Continuous Twist Tester
Principle:
This twist tester is a modification of the above instrument and permits the continuous testing of a number of one-inch test specimens without undue handling of the yarn. This instrument is therefore capable of giving more reliable results on the short- term variation in twist in the yarn.
It works on the same principle as the above instrument, viz. the straightened- fiber principle. As the test specimen has to be static during a twist test, the term ‘continuous’ simply implies that one-inch lengths of the test yam can be evaluated successively and quickly, one after another, on an extended length of the yarn.
Construction:
The figure shows a continuous twist tester. It has a broad base A, on which are mounted from left to right a peg to support a yarn package C, a thread guide D, a magnifying lens E, a fixed jaw F, a rotatable jaw G, connected to a revolution counter H that indicates the reading on a dial, a handle I and a winding drum J. Both the jaws can be moved, in a translational motion either to the left or to the right, in a slot provided in the base of the instrument. This arrangement allows specimen lengths of 1″, 5″ or 10″. A test specimen K is shown mounted between the two jaws. A zero-set knob in the instrument helps to set the pointer in the dial to zero.

Test Procedure:
i) Using 1-inch test specimens
The distance between the two jaws is set at one inch by moving the rotatable jaw appropriately.
The test yarn sample is drawn from the sample package and passed through the guide, the fixed jaw and the rotatable jaw, and finally wound on to the take-up drum
The jaws are closed to clamp an inch length of the specimen.
The revolution counter is set to zero by adjusting the zero-set knob.
The twist direction in the test yarn is identified by means of the magnifying lens. The rotatable knob is then rotated to untwist the yarn.
After the major portion of the twist is removed, a sharp needle is inserted into the untwisted strand as close to the fixed jaw as possible and moved towards the rotatable jaw while looking through the magnifying lens. Complete untwisting is achieved by rotating the jaw one way or the other until it is possible to push the needle right up to it.
The TPI of the test specimen can now be directly read from the dial and recorded as m1.
The yarn is then twisted back to its original level of twist, as indicated by the zero reading on the dial. The original twist is thus put back into the test specimen.
The rotatable jaw is then opened and moved leftward to the fixed jaw until the two jaw faces touch each other.
The fixed jaw is now opened and the rotating jaw is closed and pulled back to its original position. This brings in a new 1-inch specimen in between the jaws. The fixed jaw is now closed.
The take-up drum is rotated to take up the slack yarn at its left.
The new test specimen is then evaluated for twist. Let its reading be m2.
The above procedure is repeated until the required number of tests is completed.
The mean TPI value is then calculated from the individual readings m1, m2, m3, m4. . .mn.. and reported.
ii) Test lengths greater than one inch
The above general procedure can be used to test yarn for twist using 5-inch and 10 inch test specimens. The greater the test length the fewer will be the number of test specimens to be tested.
Advantages of this instrument
Unnecessary handling of material between successive tests is avoided.
Shorter variations in TPI values along a continuous length of yarn can be assessed.
❷ Twist contraction technique or the untwist and retwist method
Principle:
Also known as the twist-and-retwist method, this technique works on the principle that the twist in a given length of yarn, under specified tension, is removed by untwisting. This causes the yarn to extend in length. The original level of twist is then inserted into the yarn but in the opposite direction. As a result, the yarn reverts to its original length (change from Z-direction to S direction or vise versa). The number of turns required to untwist and retwist the yarn is noted and the TPI is calculated. The contraction in length when a strand of parallel fibers is twisted in a given direction will generally be equal to the contraction it suffers when it is twisted in the opposite direction.

Twist contraction: The twisting together of two strands causes a contraction effect that must be known in order to calculate the count of the plied yarn accurately. The twist contraction principle holds good even when a strand of parallel fibers (or filaments) is twisted.
In general, if the length of the strand before twisting is L and upon twisting the contracted length is L1, the twist contraction C is given by C = L – L1.
Extension on Untwisting: If the above yarn of length L1 were untwisted so that no twist remains, the resulting strand would have a length equal to L.
Contraction on Re-twisting: Further, if the untwisted strand above were twisted in the opposite direction of its original twist, such that the same level of twist is attained, the length of the resulting yarn would again be L1.

Tension type Twist tester
A typical tension-type twist tester is shown in the figure. It is specifically designed to apply the twist contraction principle to single spun yarns. Essentially, it consists of two pillars, mounted on a solid base. A fixed jaw is mounted on a pillar. This jaw is connected to a tension scale that has a sliding weight that can be set at any required point on the scale, the lower end of which is a pointed tip. The whole scale is in effect a small pendulum. At the base of this pillar is a fixed index mark.
The other pillar carries the rotatable jaw I, which is connected to handle and a revolution counter through gears. The gear ratio is such as to display the TPI of the test specimen at the end of the test. The mechanical counter displays four digits. The first two digits represent whole numbers while the next two indicate two decimal places. A zero setting knob is connected to the counter. The test specimen mounted in between the fixed and rotatable jaws. The specimen length in this instrument is a fixed 10″. In some testers of this kind there is an arrangement to change the specimen length by sliding the fixed jaw pillar along a slot in the base.

Test Procedure:-The sliding weight on the tension scale is first set according to the count of the test yarn and the instrument constant, which will usually be provided by the concerned instrument manufacturer. For example, a particular manufacturer recommends that the following formula be used to arrive at the tension setting.
Tension scale reading = 156/English count
Yarn from the test package is first gripped in the fixed jaw and then led through the rotatable jaw. It is pulled through the latter jaw until the knife-edge tip of the pendulum pointer is exactly in line with the fixed index mark at the base. This jaw too is then closed.
At this stage, the test specimen is under recommended tension and has a test length or gauge length of 10″.
The mechanical counter is now set to zero using the zero-set knob.
The twist direction of the test specimen is ascertained, if necessary by means of a magnifying lens and the handle is rotated so as to untwist the yarn.
As the twist in the 10 inch specimen is removed, the yarn extends and the tension in it falls; as a result, the pendulum pointer moves away from the index mark and eventually reaches its position of rest (i.e. the vertical position). At this stage, all the twist has been removed from the sample.
The jaw is kept rotating in the same direction until sufficient twist has been inserted to bring the pointer gradually back to coincide with the index mark.
Thus, in this method, the twist is first removed by untwisting and then put back by re-twisting the untwist and retwist principle.
The revolution counter reading is noted and recorded. As stated earlier, this is the value of the TPI of the test specimen.
❸ Twist-to-Break Technique of Twist Measurements
The twist-to-break technique is not a reliable method for everyday tests with yarns and is therefore not much used these days. Its mention here is merely for historical interest.
Principle:
A specific short length of yarn is twisted in a twist tester until it breaks. Another specimen of the same length is then twisted to break by twisting it in the opposite direction. If Ns are the number of turns required in the first case and N2 those in the second instance, the TPI of the yarn is given by (NS – N2)/ 2.
❹ The microscopic technique
This technique is more suitable for research work on special model yarns rather than for routine yarn testing. The fact that only a very small portion of the yarn is tested at a time and that the technique is therefore very slow makes it inconvenient for regular testing. However, the textile technologist is encouraged to be aware of this technique.
Principle:-A microscope equipped with a graduated rotary sample stage is used to measure the helical angle of the twist in the yarn. The yarn diameter is also measured. From these two quantities the twist per unit length is calculated.
The microscopic arrangement:-Line diagrams depicting the principle of the technique are shown in the figures (a) and (b). Note the circular rotary stage A of the microscope with graduations in degrees at its periphery.
The rotary microscopic stage can be fixed at any desired position by means of a small screw catch B. Note also the fixed index mark C close to the circular stage against which the angular positions of the stage can be read off The eyepiece used should be a crosswire eyepiece haying a built-in micrometer scale to measure the yarn diameter. A magnified View of the yarn as seen through the eyepiece is superimposed at the center of the diagrams. The two perpendicular cross wires can be clearly seen in these views.

Test Procedure
The circular rotary stage is first set so as to have its ‘zero’ mark coinciding with the index mark It is then fixed in this position.
A length of yarn mounted on a microscopic glass slide is placed on the rotary stage and held in position by the catches normally available on the stage itself.
The yarn is brought into sharp focus and the eyepiece is turned one way or another so that one of the cross wires of the eyepiece is parallel to the yam axis.
The stage catch is released and the stage rotated slowly until the crosswire is tangential to the helix formed by the twisted fibers on the yarn surface. The stage catch is again turned onto fix the stage in this new position.
The angle through which the stage is rotated is noted. This is the yam twist angle.
Now the eyepiece is rotated so that the micrometer scale is perpendicular to the yarn axis. The width of the yarn is read off on the scale. The yam diameter is then calculated in terms of inches.
Calculations:- Let the yarn diameter be d inches also the twist angle θ . The length of yarn occupied by one turn of twist is therefore given by

The values of θ and d are known, so the yarn tpi can be calculated
Disadvantage
As stated earlier, this method has disadvantages. These are listed below.
Accurate determination of the yarn twist is not possible as a very small portion of the yarn is examined at a time. A very large number of readings would have to be taken to have representative values of the twist.
The technique is tedious and considering the large number of tests, operator fatigue could affect the results.
This technique is therefore unsuitable for routine testing and quality control.
(12352)
